fbpx
Frame-14

Privacy Ninja

        • DATA PROTECTION

        • CYBERSECURITY

        • Penetration Testing

          Secure your network against various threat points. VA starts at only S$1,000, while VAPT starts at S$4,000. With Price Beat Guarantee!

        • API Penetration Testing
        • Enhance your digital security posture with our approach that identifies and addresses vulnerabilities within your API framework, ensuring robust protection against cyber threats targeting your digital interfaces.

        • On-Prem & Cloud Network Penetration Testing
        • Boost your network’s resilience with our assessment that uncovers security gaps, so you can strengthen your defences against sophisticated cyber threats targeting your network

        • Web Penetration Testing
        • Fortify your web presence with our specialised web app penetration testing service, designed to uncover and address vulnerabilities, ensuring your website stands resilient against online threats

        • Mobile Penetration Testing
        • Strengthen your mobile ecosystem’s resilience with our in-depth penetration testing service. From applications to underlying systems, we meticulously probe for vulnerabilities

        • Cyber Hygiene Training
        • Empower your team with essential cybersecurity knowledge, covering the latest vulnerabilities, best practices, and proactive defence strategies

        • Thick Client Penetration Testing
        • Elevate your application’s security with our thorough thick client penetration testing service. From standalone desktop applications to complex client-server systems, we meticulously probe for vulnerabilities to fortify your software against potential cyber threats.

        • Source Code Review
        • Ensure the integrity and security of your codebase with our comprehensive service, meticulously analysing code quality, identifying vulnerabilities, and optimising performance for various types of applications, scripts, plugins, and more

        • Email Spoofing Prevention
        • Check if your organisation’s email is vulnerable to hackers and put a stop to it. Receive your free test today!

        • Email Phishing Excercise
        • Strengthen your defense against email threats via simulated attacks that test and educate your team on spotting malicious emails, reducing breach risks and boosting security.

        • Cyber Essentials Bundle
        • Equip your organisation with essential cyber protection through our packages, featuring quarterly breached accounts monitoring, email phishing campaigns, cyber hygiene training, and more. LAUNCHING SOON.

New Windows 10 Policy Lets You Disable Cloud Customized Taskbars

New Windows 10 Policy Lets You Disable Cloud Customized Taskbars

Microsoft has added a new group policy in Windows 10 20H2 that allows you to disable a new feature that customizes the taskbar based on what accounts or devices you have.

In the Windows 10 Insider Build 20161, Microsoft introduced a new feature called “Programmable Taskbar” that customizes the Windows 10 taskbar when logging into an account for the first time.

The Programmable Taskbar is a new cloud-based feature that will add different pinned programs on the taskbar depending on what types of accounts a user has or what devices are linked to a computer.

For example, the image below illustrates how the cloud-based Programmable Taskbar feature will modify the default taskbar based on whether users on the device are linked to Android phones or have Xbox Live accounts.
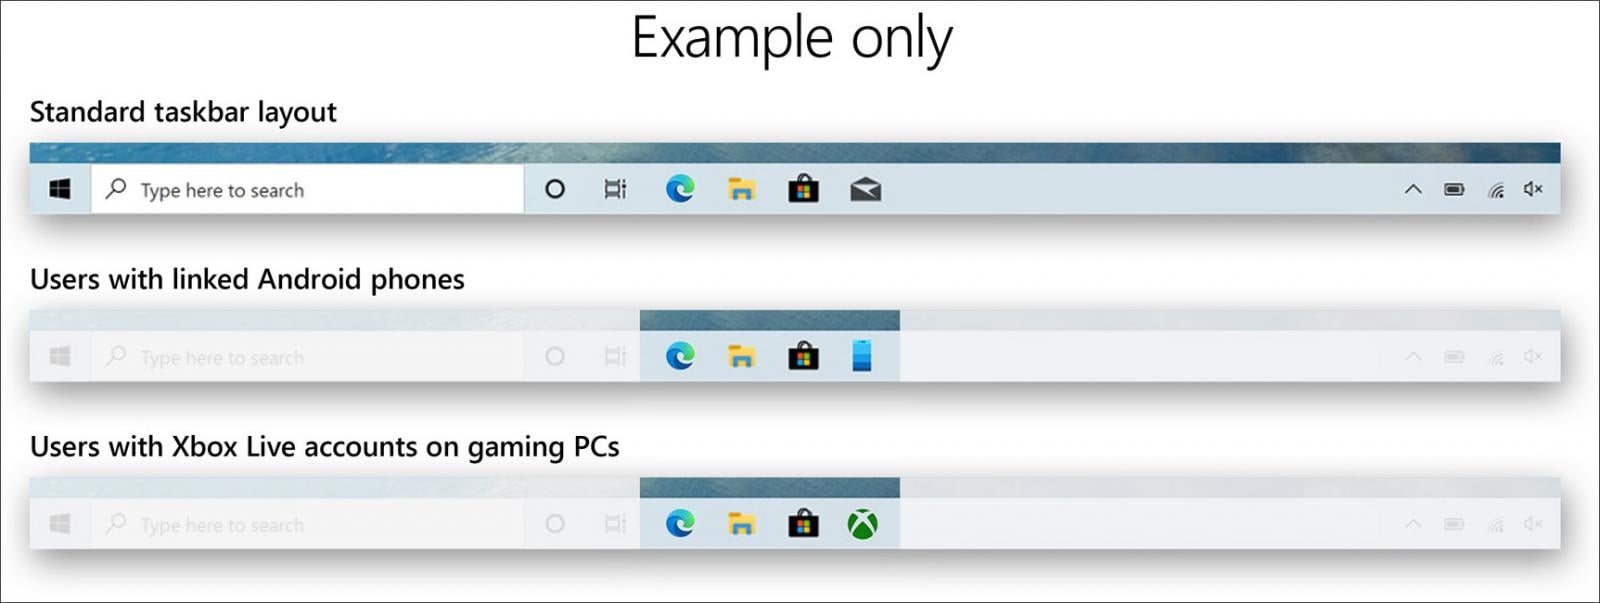
Example of customized Windows 10 taskbars

This feature is now live in Windows 10 20H2 and does not modify the taskbar for any existing accounts, but only for new accounts or accounts logging in for the first time.

Also Read: How to Send Mass Email Without Showing Addresses: 2 Great Workarounds

How to disable the Programmable Taskbar feature

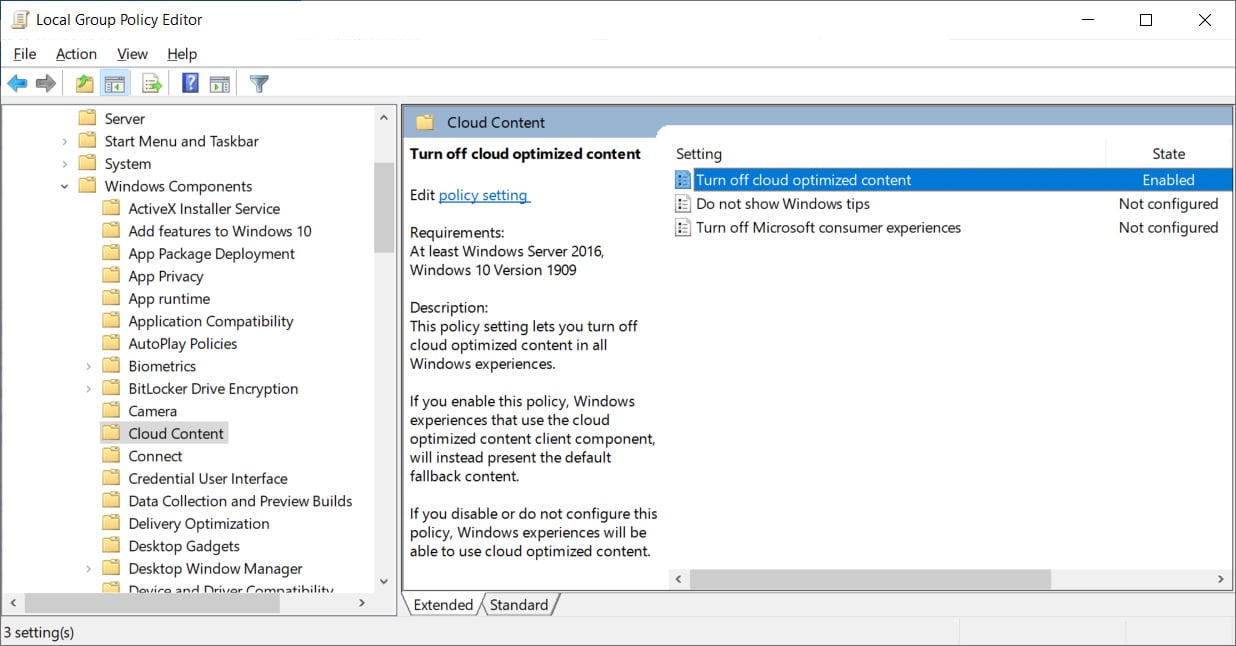
For those who wish to always use the default Windows 10 taskbar, Microsoft has introduced a new group policy called ‘Turn off cloud optimized content’ that allows you to disable the Programmable Taskbar feature.

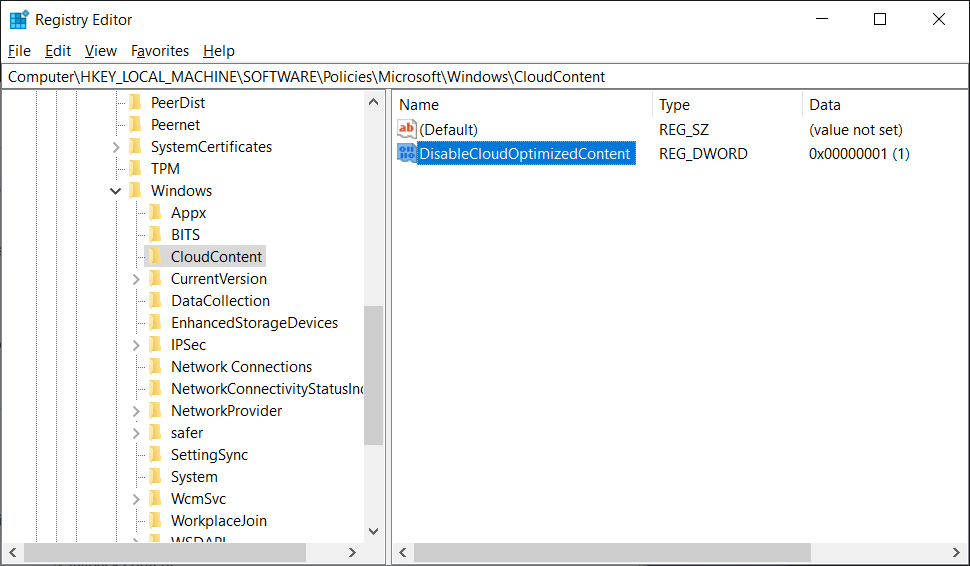
When enabled, this policy will create a DisableCloudOptimizedContent value and set it to 1 under the HKEY_LOCAL_MACHINE\SOFTWARE\Policies\Microsoft\Windows\CloudContent Registry key.

Windows Registry Editor Version 5.00

[HKEY_LOCAL_MACHINE\SOFTWARE\Policies\Microsoft\Windows\CloudContent]
“DisableCloudOptimizedContent”=dword:00000001

Below we have provided ways to enable this policy for Windows 10 Pro and Windows 10 Home.

Method 1: Disable the Programmable Taskbar feature via the Group Policy Editor

Windows 10 Pro comes with the Group Policy editor, which you can use to disable the Programmable Taskbar feature by following these steps:
  1. Search in the Start Menu for ‘gpedit.msc‘ and select it when the result appears.
  2. When the Group Policy Editor opens, navigate to the following path: Computer Configuration\Administrative Templates\Windows Components\Cloud Content.
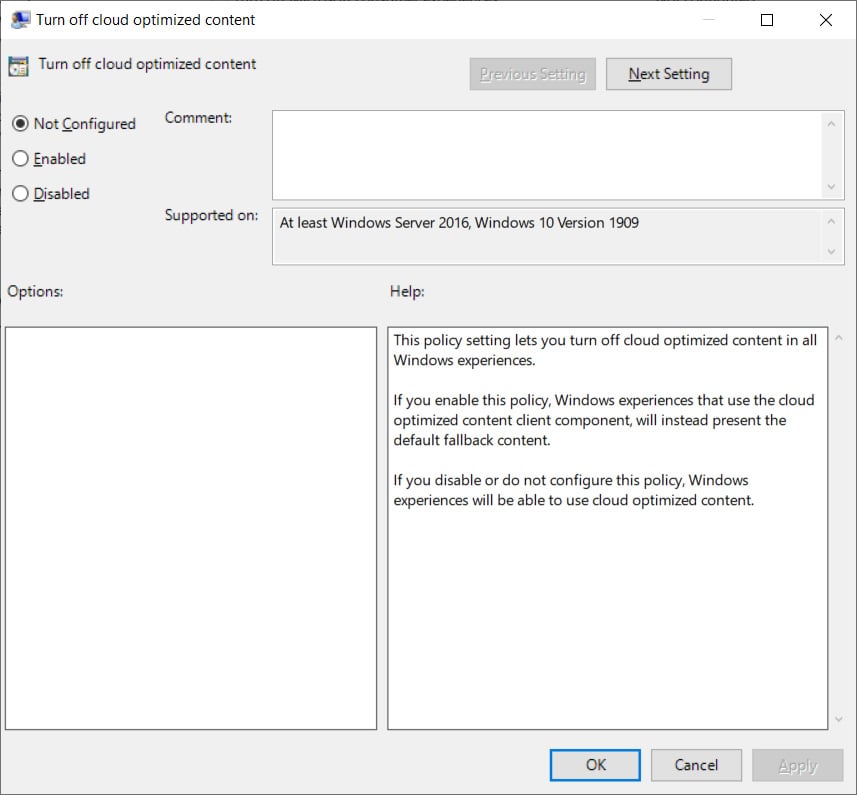
  3. Under the File Explorer section, you will see a policy called ‘Turn off cloud optimized content’ as shown below. Double-click on the policy to open it.Group Policy
  4. To disable Bing search, set this policy to ‘Enabled.’Editor
  5. When done, click on the Apply and then OK button to save the policy.
  6. You can now close the Group Policy Editor.

New accounts will now use the default Windows 10 taskbar.

Also Read: How a Smart Contract Audit Works and Why it is Important

Method 2: Use the Registry Editor to disable Bing integration

For Windows 10 Home users, you must configure this setting using the Registry Editor by following these steps:
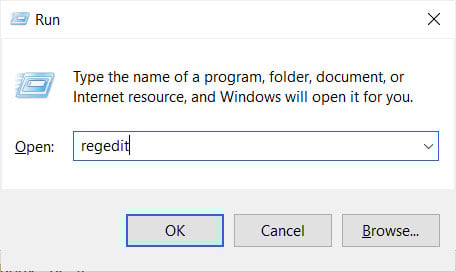
  1. First, open the Windows Registry Editor by pressing the Windows key + the R key simultaneously.
  2. This will open the Run: dialog and then type regedit and press the OK button.Starting Registry EditorStarting Registry Editor
  3. Windows will display a UAC prompt asking if you wish to allow the Registry Editor to make changes to the system. Press the Yes button to continue.
  4. Navigate to the HKEY_LOCAL_MACHINE\SOFTWARE\Policies\Microsoft\Windows\CloudContent key. If the key does not exist, create the necessary folders until you are in the Explorer key.
  5. Right-click on CloudContent and select New and then DWORD (32-bit) Value, as shown below.New DWORD valueNew DWORD value
  6. You will be prompted to enter the name of the new value. Type DisableCloudOptimizedContent and press Enter on the keyboard. A new value will be created that should automatically be set to 0. Now double-click on DisableCloudOptimizedContent and set the value to 1, and then press the OK button.
  7. When done, you should have the DisableCloudOptimizedContent value created and set to 1, as shown below.DisableSearchBoxSuggestions value enabled
  8. You can now close the Registry Editor.

New accounts will now use the default Windows 10 taskbar.

0 Comments

KEEP IN TOUCH

Subscribe to our mailing list to get free tips on Data Protection and Data Privacy updates weekly!

Personal Data Protection

REPORTING DATA BREACH TO PDPC?

We have assisted numerous companies to prepare proper and accurate reports to PDPC to minimise financial penalties.
×

Hello!

Click one of our contacts below to chat on WhatsApp

× Chat with us